Gomukhasana – Cow Face Pose, Right Method, Benefits
By Dr Raghuram Y.S. MD (Ay) & Dr Manasa, B.A.M.S
Gomukhasana, in this pose the position of the legs resembles the face of a cow and hence the name. The thighs and calves are placed in such a way that they are wide at one end and tapering at the other. It is a seated hip opener pose.
Go = cow
mukha = face
asana = pose
Philosophy related to the pose – the shape of the knees in the pose looks like the lips of a cow. Feet looks like horns of a cow and arms resemble ears of a cow. This pose inspires you to maintain the generosity and calmness of a cow.
According to other opinions, go also means light. Gomukh also means lightness of the head or light in the head.
This pose is found described in darshana upanishad, a 4th century treatise. This pose is often used for practicing meditation and pranayama.
The ideology – this pose actively involved the shoulders and hips. Both these are the seats of tension and chronic pain. The pose enhances the range of motion in the shoulder joints. It relaxes the muscles and imparts a feel of calmness. The tension in the joints of muscles and tendons get escalated. The spinal cord signals the muscles to relax as a result of this. The stretch created in this pose leads to release of endorphins. These bring about body-mind relaxation.
Read – Types Of Pranayama – Effect on Health – Through An Ayurveda View-Point
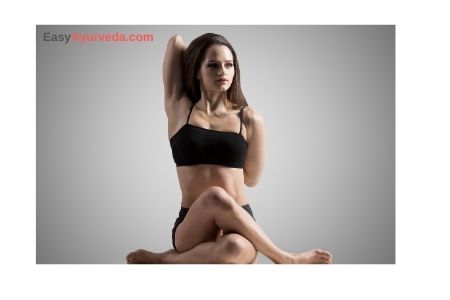
Table of Contents
Preparation for gomukhasana
- Gomukhasana i.e. the cow face pose should be done on empty stomach preferably early in the morning.
- It can also be done at evening or some other part of the day. When done so, food should be taken 3-4 hours before doing the pose. This will keep your stomach empty by the time you take up to your asana. The food consumed will also provide you with good energy to perform the pose.
- The bladder and bowel should be kept empty while doing / starting the pose.
Method of doing gomukhasana
Positioning for the pose
Sit in dandasana with your torso straight and your legs extended in front of you.
Getting into the pose
Now bend your legs at your knees. Those having tight hips may use blocks beneath their butts. This will keep your pelvis neutral and not trouble your knees in the pose. Keep your spine and neck straight and tall.
Tuck your left leg beneath the arch of your right leg such that your left heel is placed beside your right butt. The left knee is on the floor in line and aligned with your navel button.
Now bring your right leg over your left leg such that your foot rests on the ground beside your left thigh. Now with the help of your left hand hold the right foot and pull it gently behind, closer towards your body and towards your left hip. With this your right knee too will move little down and forward such that it is right on top of the left knee but not meeting it. This is the intended position wherein your knees lay one on top of the other. If you cannot push your right leg back due to tightness in your hip or thigh, place your foot a little ahead or at a place where you are comfortable placing it. Heels are by the side of your hips now. Keep both hands on your upper (right here) knee. Center yourself to balance here.
Next raise your right hand up and bend it at the elbow such that your hand reaches your shoulder blade with the elbow pointing upwards and to the right. Your right shoulder is rotated internally now.
Now bend your left hand at the elbow and take it behind your back such that the back of your hand is touching your middle back. Your left shoulder is rotated outwards here. Push your left elbow behind and in, towards the spine. Raise this hand up along the spine so as to reach your right hand.
Now interlock the fingers of both hands. If you find it difficult to bring your fingers together use a belt or strap. Be here for few seconds or 4-5 breaths. Pull your right elbow little above while giving a gentle pull to your left elbow upwards. Alternately you may pull your left elbow down while gently pulling your upper (right) elbow down. You can do this few times. Use the interlocked fingers or belt to do this. Or you can just stay neutral with the fingers interlocked behind your back.
Breathe in freely and feel your chest expanding to the front, from the sides and also from the back. Breathe deeply and slowly and stay here for 3-5 breaths.
Read – Akarna Dhanurasana – Archer’s Pose, How To Do, Benefits
Release from the pose –
- Release the interlocked fingers.
- As you exhale, slowly bring your left hand to the front and place it on your upper knee.
- Now bring your upper (right) hand to the front and place on your upper knee.
- Release your knees and keep them flexed while placing your feet on the ground.
- Now tuck your right leg beneath the left leg, bring your left leg over the right leg such that your left knee is on top of your right knee and repeat the same steps.
- Alternatively you may go back to dandasana and repeat the same steps with your left leg on top of your right leg.
Variations
- Vajra gomukhasana – in this, your legs are in vajrasana. Your upper body and arms are in gomukhasana.
- Hasta gomukhasana – in this, you sit in gomukhasana and your arms are not behind your back. Instead they are raised above your shoulders. Your arms at this level cross each other and your elbows point to the ceiling.
- Mahavajra gomukhasana
- Baddha gomukhasana
Other variation
Lean forward from the full pose and lay the front portion of your torso on the inner side of your top thigh. Be here for 20 seconds. Inhale and come up.
Read – Ardha Baddha Konasana – Half Bound Angle Pose, How to do, Benefits
Modifications
If you cannot clasp your fingers, take your hands backward and hold elbow to elbow with your legs stretching and crossing one over the other. You can do it instead of finger clasp too. When your body becomes flexible and becomes easy to stretch you may perform the pose as it needs to be done.
You may use a folded blanket or block to lift your sitting bones off the floor. This would support them evenly. This even makes it easy to stack your knees one on top of each other.
Use a belt or strap if you cannot reach your hands so as to interlock your fingers.
You may modify the sitting position either by putting a folded blanket on the heels. If there is a need put a folded blanket one beneath them.
Related video
https://www.youtube.com/watch?v=d_dh_DwDr84
Health benefits
- It affects all the major joints of the leg and hand positively i.e. ankles, knees, hips, wrists, elbows and wrist. It also has a positive effect on the chest.
- It allows good mobility in the joints, twists the ankles and knees, rotates hip externally.
- It makes flexible the muscles around your arm and shoulders, elbows and wrist and triceps.
- Stretches shoulders, arms, armpits, hips, ankles, thighs and chest.
- Stretches triceps muscle.
- Strengthens back and chest.
- Releases the tightness from shoulders and makes it flexible.
- Helps to tone the major muscles of your body.
- Makes your back elastic and flexible.
- Remedy for stiff shoulders and sciatica.
- Flexes the spine, releases the cervical spine and pain therein.
- Relieves backache, rheumatism, shoulder and neck stiffness, leg cramps and sciatica.
- Good pose for those who are in seating jobs since it counteracts with the ill effects of excessive sitting by opening up your chest and hips.
- Improves body posture.
- Activates digestive system
- Makes the pericardial area accessible since it expands the chest effectively
- It opens up the chest and heart. Functions of breathing, oxygen flow and circulation of blood are benefitted and also improved.
- Enhances cardiovascular endurance, flexibility and muscular strength
- Stimulates and enhances the functioning of kidneys, activates urinary bladder
- Good pose for those suffering from diabetes
- It is a calm and centering pose, bestows relaxation
- Reduces stress, anxiety, tiredness and tension if practiced regularly
- Release negative emotions and recharge body with positive energy
- Improves posture by increasing energy, awareness and opening the chest area
- Activates muladhara, swadisthana and anahata chakras
Preparatory poses
- Baddha konasana – bound angle pose
- Upavistha konasana – wide angle seated forward bend pose
- Supta baddha konasana – reclining bound angle pose
- Virasana – hero pose
- Supta virasana – reclining hero pose
- Supta padangusthasana – reclining hand-to-big toe pose
Follow up poses
- Ardha matsyendrasana – half lord of the fishes pose
- Padmasana – lotus pose
- Bharadvajasana – sage bharadvaja’s pose
- Upavistha konasana – wide angle seated forward bend pose
- Paschimottanasana – seated forward bend pose
- Garudasana – eagle pose
- Marichyasana iii – marichi’s pose iii
Time spent doing gomukhasana
Be in the pose for 30-60 seconds.
Impact on chakras
This pose is said to open up and balance ajna chakra – the third eye chakra and anahata chakra – heart chakra. It also balances muladhara chakra – root chakra and swadisthana chakra – sacral chakra.
Read – Chakra – Kundalini: Introduction, Meaning, Types, Location, Ayurveda View
Contraindications, Precautions
Patients suffering from below mentioned conditions should avoid doing gomukhasana –
- Issues and injuries pertaining to shoulder, wrist and hip
- Bleeding piles
- Spondylosis
- Injury in muscles, ligaments and tendons
- Muscle tears
- Severe pain in thighs
- Rotator cuff injury
- Backache
Caution
- Keep your spine aligned rather than twisted. Keep your body in a straight line from your crown to the tailbone.
- While trying to join your hands, avoid twisting your hands and wrists.
- After clasping your hands at the back do not pop your ribs in front of you. Instead drop your tailbone to the floor and broaden your lower back.
- Avoid rounding your back and curve your chest inwards. Instead spread your collarbones.
Impact on doshas and tissues
Impact on doshas and its subtypes – this pose balances vata dosha. This pose mainly has a strong impact on the chest region and also opens up the chest and heart and also improves the functions of lungs and heart. Therefore it is useful in balancing the chest doshas i.e. udana vata, vyana vata, sadhaka pitta and avalambaka kapha. Since it balances the flexibility and mobility of the joints and muscles it is good for the health of shleshaka kapha and vyana vata. It is good for the digestive system and improves the digestive functions and hence is good for balance of the stomach and gut doshas i.e. samana vata, pachaka pitta and kledaka kapha. The pose has a positive impact on the urinary system and hence is beneficial in balancing pachaka pitta and apana vata functions. Since the pose is the best one to relieve the practitioner from stress, anxiety and negative emotions, calms and relaxes the system it is the best one for balancing prana vata, sadhaka pitta, tarpaka kapha and vyana vata.
Impact on tissues – this pose strengthens and stretches, makes flexible and improves the tone and mobility of most muscles and joints in the body and also improves posture. It also helps in relieving the tension and painful conditions in these tissues. Therefore it is beneficial for the health and fitness of muscle tissue and joints.
Click to Consult Dr Raghuram Y.S. MD (Ayu)


