Ardha Uttanasana – Standing Half Forward Bend Pose, Method, Benefits
By Dr Raghuram Y.S. MD (Ay) & Dr Manasa, B.A.M.S
Uttanasana gives powerful stretch to your body. It is a pose involving forward bending. Therefore it is called as standing forward bend. Ardha Uttanasana is doing this pose till half of uttanasana pose. The pose is either started from standing position, bending forward or from uttanasana rising upwards. In both variants the practitioner finishes the pose by keeping his torso, neck, head and tailbone in a straight line, perpendicular to the legs and parallel to the floor assuming a table top position. Since it is half of uttanasana it is called ardha uttanasana, ardha means half. Therefore this asana is called as standing half forward bend pose.
Ardha = half
Uttana = Powerful Stretch (Ut – powerful, Tan – to stretch)
Asana = pose
Like Uttanasana, Ardha Uttanasana too is a powerful stretching pose. It rejuvenates and heals body apart from giving the needed stretch.
It is a fundamental transition pose in Surya Namaskara i.e. Sun Salutation sequence. It is a transition between Uttanasana and Chaturanga Dandasana. Other name – Flat Back
Read – Uttanasana – Standing Forward Bend Pose, How To Do, Benefits
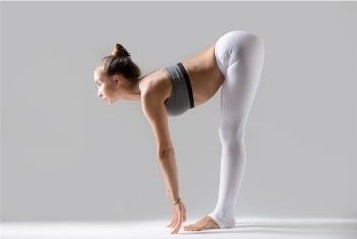
Table of Contents
Preparation for Ardha Uttanasana
- Ardha Uttanasana i.e. ‘half standing forward bend’ pose should be done on empty stomach.
- It is preferably practiced in the early hours of the morning.
- If it is to be done during evening or at any other part of the day the food should be consumed 3-4 hours before performing the asana.
- One needs to keep their bowel and bladder empty while taking on to the pose.
Read – Health Benefits Of Yoga: Mind And Body
Method of doing
Method 1 – From standing position
Positioning for the Asana
- Stand straight on the floor or yoga mat.
- Keep your feet hip width apart if you are a beginner. If you are an advanced practitioner you may start by keeping your feet together.
Performing and getting to the Ardha Halasana
- Now slowly raise both your hands up keeping your arms besides your ears while inhaling such that they are parallel to each other and with fingers pointing to the ceiling. (Alternatively you may place your hands on your hips or low back and start bending from here).
- While exhaling slowly bend forwards on your lower back (not at the mid back or waist) at your hips.
- Bend to a level such that your tailbone, torso, neck, head and hands are in a straight line and parallel to the floor. You have now made the shape of a tabletop with this bend.
- Keep your head and neck neutral while looking at the floor. Don’t drop your head too down or lift the chin too up. Push your belly button towards the spine. Don’t engage your abs. push your belly slightly towards your hips. You may also have a table or chair in front of you to place your hand upon. Let your shoulders be down and relaxed, open outwards. Don’t let your chest to collapse.
Progressing to uttanasana (optional) – After being here for few breaths, drop your hands to the ground. Keep your arms on the floor or even your fingers. If you cannot reach the floor with your hands, keep your hands on the shin or thigh but not on your knees. You can also bend your knees if you cannot keep your legs straight.
Release from the asana
- From standing forward bend (if you have proceeded to standing forward bend) – From here slowly raise your arms up while raising your torso (if you are doing from straight forward bend), come to the half straight forward bend and gradually rise to the point of start breathing easily. Bring your hands beside your body. Stand easily and relax.
- From standing half forward bend – If your final pose is half straight forward bend, raise your hand up gradually along with your torso. Come back to the point of start. Drop your arms by the side of your body. Breathe easily and relax.
Read – How To Do Pranayama – A Simple Pranayama Technique
Method 2 – From Uttanasana i.e. standing forward bend pose
- Be in uttanasana – standing forward bend pose
- Take few breaths easily here.
- Keep your hands or fingertips on the floor, one on each side of your foot. Alternatively you can place your hands on your shins or on yoga blocks at the sides of your feet.
- Slowly come up onto your fingertips.
- With inhalation raise your torso gradually, away from your thighs, keeping your spine flat and straight. Straighten your elbows.
- Exhale smoothly. Lift your collarbones and sternum and your torso such that the crown of your head points forward and your tailbone behind. Simultaneously draw your shoulder blades together and keep them engaged.
- You can bend your knees slightly. This helps to straighten your spine and torso. Your knees should not be locked or bent too much; you can make a small micro-bend of your knees to ease you at the pose.
- Press your palms or fingertips into the floor so as to enable you to lift and straighten your torso. Now your torso, head, neck and tailbone are in a straight line, parallel to the floor.
- Inhale. Lift your head and look forward. See that your neck is neutral and is not compressed. Keep your torso straight.
- Keep your quads and pull them towards the ceiling. Don’t lock your knees, keep them slightly bent.
- Bring your weight to the balls of your feet. See that you keep your hips aligned over your ankles.
- See that you keep your spine aligned through your back and neck.
- With each inhalation, slightly lift and lengthen your torso.
- Keep in touch with your breathing. Concentrate on deep inhalation and exhalation. With the flow of movements of the pose coordinate with each of your breath.
- Hold in this pose for about 60 seconds.
Release from the pose
- Exhale.
- Return back to uttanasana.
- Repeat this 5-10 times.
- If you are doing Sun Salutation, move from ardha uttanasana to low lunge, plank or chaturanga.
Read – Surya Namaskar – Sun Salutation, Meaning, How To Do, Benefits
Health Benefits
- Gives good stretch to your hamstrings
- It brings about good alignment of your spine
- Stretches the front torso
- Strengthens the back and improves posture
- Increases the flexibility of your spine and spinal cord
- It strengthens the muscles of your core, hips, upper back, lower back, hamstrings and calves
- It reduces the risk of injuries to the back and spine.
- It is a good exercise and helps in building up strength and flexibility that would need for practicing and performing advanced yoga poses and sequences
- Stimulates abdominal organs and promotes good digestion
- Good remedy for asthma, headache, infertility, sinusitis, osteoporosis, menstrual cramps and insomnia.
- Lowers hypertension.
- Improves blood circulation in head, replenishes the brain cells.
- Beneficial in anxiety, depression and stress.
- Keeps mind calm and focused
- Enables you to practice yoga breathing
Preparatory Poses
- Uttanasana – Standing Forward Bend
- Phalakasana – Plank Pose
- Tadasana – Mountain Pose
Follow Up / Sequential Poses
- Prasarita Padottanasana – Wide legged forward fold
- Chaturanga Dandasana – High to mid plank
Counter Poses
- Bhujangasana – Cobra Pose
- Salamba Bhujangasana – Sphinx Pose
- Matsyendrasana – Supported Fish Pose
Sequences
Ardha Uttanasana can be done as a part of the below mentioned sequences –
- Surya Namaskara – Sun Salutation sequences
- Chandra Namaskara – Moon Salutation sequences
- Virasana – Warrior Pose sequences
Modifications and variations
Place your hands on shins if you can’t touch the floor keeping your knees straight. Alternatively you may press your hands on yoga blocks placed to the outside of your feet.
You need to keep back flat in the pose. If you have trouble keeping it flat because of being a beginner or due to lack of strength, use the wall as support. Stand in front of the wall. Your hands are out in front of you. Place palms flat against the wall. Move hands up the wall until spine is long and back is flat and torso is parallel to the floor.
Alternatively place hands on the back of a chair or flat over the wall and press against it. Walk your feet back and bend at hips until your torso is parallel to the ground.
Stand with feet at hip distance apart if you are not able to balance by keeping feet together. In sciatica maintain feet as said but turn your toes inwards and heels outwards.
This pose may be avoided in pregnancy or done under supervision. Women should stand with their feet as wide as necessary to feel stable in the pose. Fold forward as comfortable being careful not to compress the belly.
Place a blanket under your toes before you bend it. This improvises flexibility and deepens the stretch in your hamstrings.
Read – Surya Namaskar – Sun Salutation, Meaning, How To Do, Benefits
Related Video
https://www.youtube.com/watch?v=AIaZVXHRV98
https://www.youtube.com/watch?v=nq8CEGk9a3o&t=18s
Time spent doing Ardha Uttanasana
Hold in the final pose for about 60 seconds. If you are a beginner you may keep breath count to 30 seconds until you become perfect with the pose and breathing pattern. Later may extend to 60 seconds, more than or as long as you are comfortable doing it.
Impact on Chakras
This pose is associated with the third eye chakra i.e. Ajna Chakra. It stimulates this chakra effectively which improves your intuition and mental functions. This pose also activates the Heart Chakra – Anahata Chakra, Sacral Chakra – Swadishthana Chakra and Muladhara Chakra. It also engages your Navel / Solar Plexus – Manipura Chakra. This boosts your willpower and confidence.
Contraindications, Precautions
Patients suffering from below mentioned conditions should avoid doing Ardha Uttanasana –
- Severe neck and low back injury
- Glaucoma
- Tear in hamstring muscles
- Other contraindications are same as in Uttanasana
Caution
- If you have back injuries, practice with your hands resting on the back of a chair or a wall.
- Make sure you are bending from the hips as you bend forward into ardha uttanasana. Never bend from your upper back or waist. Try to place your hands on your hips as you practice.
- Keep ankles, knees and hips aligned as you bend forward.
- Keep knees slightly bent if you have issues with your lower back and face difficulty bending forward keeping knees straight.
- Do not lift your head if you have neck injuries. Look ahead or to the floor. If you have neck injury, keep your head down. Do not lift it to gaze forward.
- Legs should be strong and active. Avoid locking the knees.
Impact on doshas and tissues
Impact on Doshas and its subtypes – Ardha Utthanasana stimulates abdominal organs and also promotes digestion. Hence it is beneficial to balance pachaka pitta, samana vata and kledaka kapha. This is also possible due to the balancing effect of this pose on the solar plexus. Since the pose also helps in blood circulation to the head, good for brain functions, helps to ward off stress, anxiety and depression and keeps mind calm and focused and is a good remedy for insomnia, it helps in balancing prana vata, sadhaka pitta and tarpaka kapha and their related action axis. This is also supported by the role of this pose in balancing ajna chakra. Since it is a good remedy for hypertension it is good for vyana vata, avalambaka kapha and udana vata functions. This is also supported by the fact that this pose supports and balances the heart chakra. Since it is good for infertility and also is a remedy for menstrual cramps the pose balances apana vata functions.
Impact on tissues – Ardha Uttanasana Pose strengthens and stretches the muscles and spine, improves the flexibility, it is good for the muscles and bone tissue and also for the channels transporting these tissues. It has a good effect on sperms / semen and related channels since it is beneficial in infertility cases and also balances muladhara – root chakra and swadisthana – sacral chakra.
Click to Consult Dr Raghuram Y.S. MD (Ayu)


